|
Ewan J. Innes, MA(Hons Scot. Hist.) FSA Scot
© 1989
Synopsis: This essay describes the strategy and tactics used by the commanders of the Scottish armies during the period 1296 to 1314.
Please see my copyright policy if you wish to cite any part of this essay.
A major consequence of the invasion of Scotland by the army of Edward I in 1296, was
the necessity for a radical review and revision by the Scots of their military tactics.
Prior to the invasion, the Scots had, to a certain extent, obeyed the chivalrous rules of
engagement used throughout the Christian world. These rules were that when armies met, any
battle which took place would normally be between the opposing heavy cavalry who would
charge each other, the foot being relatively redundant.
This however proved inadequate against the well trained, well led, well armed and
experienced English heavy cavalry and foot, including contingents of Welsh archers and
spearmen.
Thus, the Scottish leaders developed the strategy of trying, wherever possible, to pick
the site and make the ground fight for them. The superior numbers which the English
invariably had would thus be negated and the Scots would have a better chance of success.
This policy of quasi-guerrilla warfare adapted to the Scottish needs was only introduced
after Dunbar and the ensuing military disasters.1
Developed alongside this was a new tactic, the use of light horse or hobelar. The use
of light horse seems to have been brought over from Ireland in the first instance by
Edward I as a means of bringing the Scots to battle. His heavy feudal army could not
follow a mobile army which retired to the hills and marshes when confronted, as the armies
under Wallace and Bruce habitually did.2 The hobelar was used by the Scots as a means of
gaining the element of speed and surprise, essential for success, thus allowing them to
engage the enemy at times and places of their choosing. The light horse were used as
raiding parties under Bruce, but Wallace also employed bodies of foot soldiers.
The Scots developed a distinctive tactic in the deployment of this type of army.
Whereas the English nobility scorned the value of the footsoldier in favour of heavily
armed, mailclad, knights, the Scottish leaders placed greater emphasis on well trained,
mobile, lightly armed footsoldiers and light horsemen.
The Scots had had little military practice during the reign of Alexander III, the only
action being between King Hakon of Norway and Alexander at Largs in 1263.3 Consequently,
they were ill-prepared to cope with an English invasion.
Before Edward had reached Scotland in 1296, a Scottish army crossed into England and,
with a ferocity which almost rivalled Edward, ravaged Redesdale and Tynedale and burned
the towns of Corbridge and Carlisle and the monasteries of Lanercost and Hexham. The
reasons for this seem to be unclear, but it could have been a preemptive strike; it was
certainly a policy to be repeatedly used by both Wallace and Bruce.
Edward was in no hurry to complete the conquest when he was so sure of success.
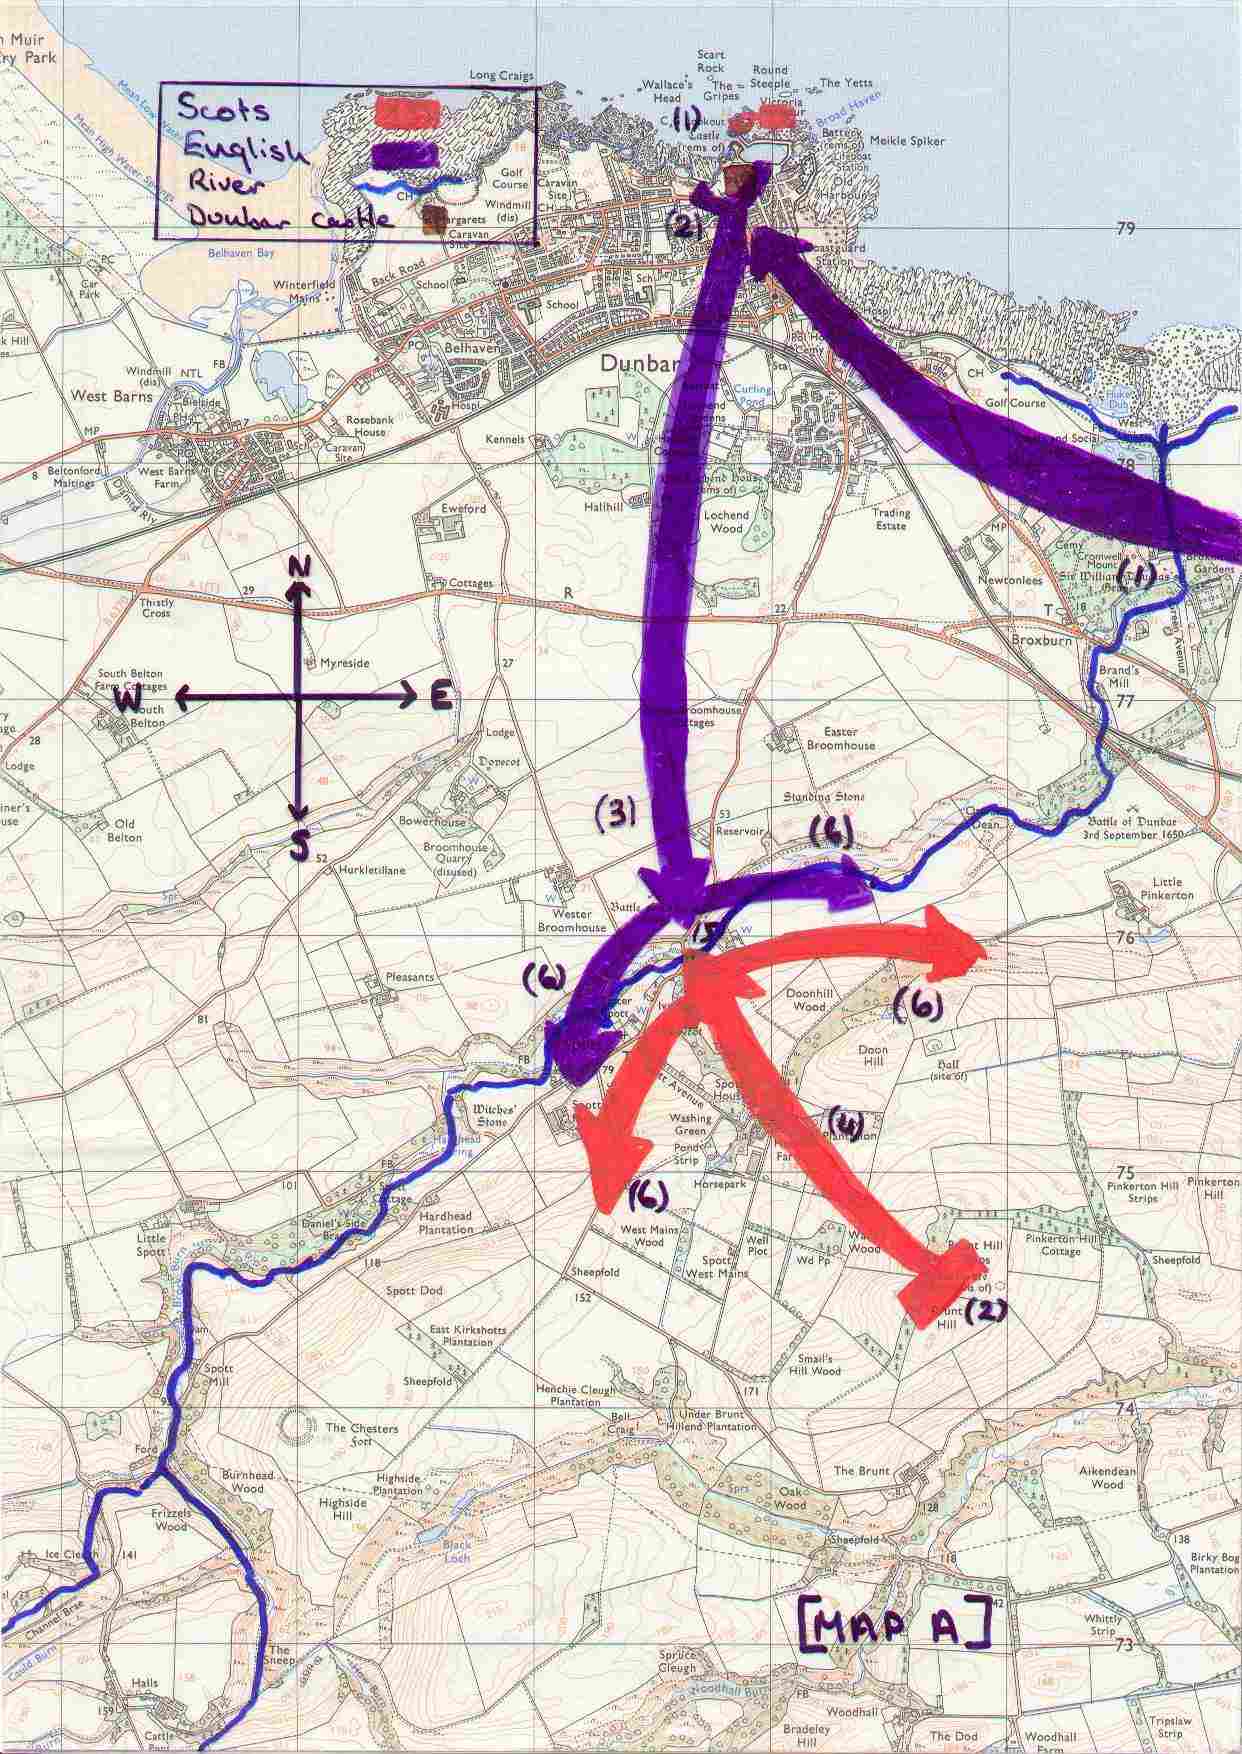
Eventually he sent a cavalry force under John, Earl Warenne to take Dunbar. Warenne, who
had begun the siege of Dunbar[Map A (1)] was attacked by
the "feudal host of Scotland".4[Map A (2)]
Warenne turned westward with his continental veterans to meet the Scots as they marched
over Spottsmuir. Before the English could reach the Scots, they had to descend into a
hollow [Map A (3)] through which flowed the Spott Burn.
The Scots observing this action believed the English to be fleeing and charged. [Map A (4)] The English however were not fleeing and formed
up in good order, throwing back the charge and setting about the broken ranks.[Map A (5)] A massacre then ensued and there were heavy
casualties among the Scottish foot.5[Map A (6)] Dunbar is
especially notable not only for the spectacular failure of the Scottish feudal host- the
official military might of the Crown- but also for the large numbers of distinguished
prisoners taken.
The example of Dunbar was not lost on the Scottish leadership. The ineptitude of the
Scottish tactics contrasted unfavourably with the skill of Warenne in controlling and
marshalling his forces, and the lack of discipline and experience of the Scottish army was
exposed. Pitched battles would have to be carefully considered before being embarked upon
in the future.
As William Wallace was leading a growing rebellion in the lowlands early in 1297, news
spread of a great rising in the north led by Andrew de Moray. As events progressed,
Wallace developed the use of a new tactic, later to be used with great success by Bruce,
i.e. the rapid deployment of fast moving light horse to attack and harass English patrols
and garrisons. These tactics pinned them back into fixed positions and made control of the
countryside- the collection of taxes and provisions- difficult. With his growing success,
Wallace had to manage ever greater numbers of men and hence his exploits increased in
scale. As the year progressed the English commanders in Scotland grew increasingly
anxious. This is shown by the worried letters to the treasury in London from Hugh
Cressingham complaining about the impossibility of raising taxes in Scotland as all was in
a state of unrest.6
In the North, Moray had cleared out most of the English forces and linked up his forces
with those of Wallace some time during the August of 1297 thereby creating a unique force,
composed of both Lowlanders and Highlanders. There was a set back with the surrender at
Irvine in July 1297 of an army under the command of the Earl of Carrick, Robert Bruce and
Sir William Douglas. They could be seen as being the more traditional leaders, in the eyes
of the country, than Wallace and Moray, but they may have had less stomach for the fight.
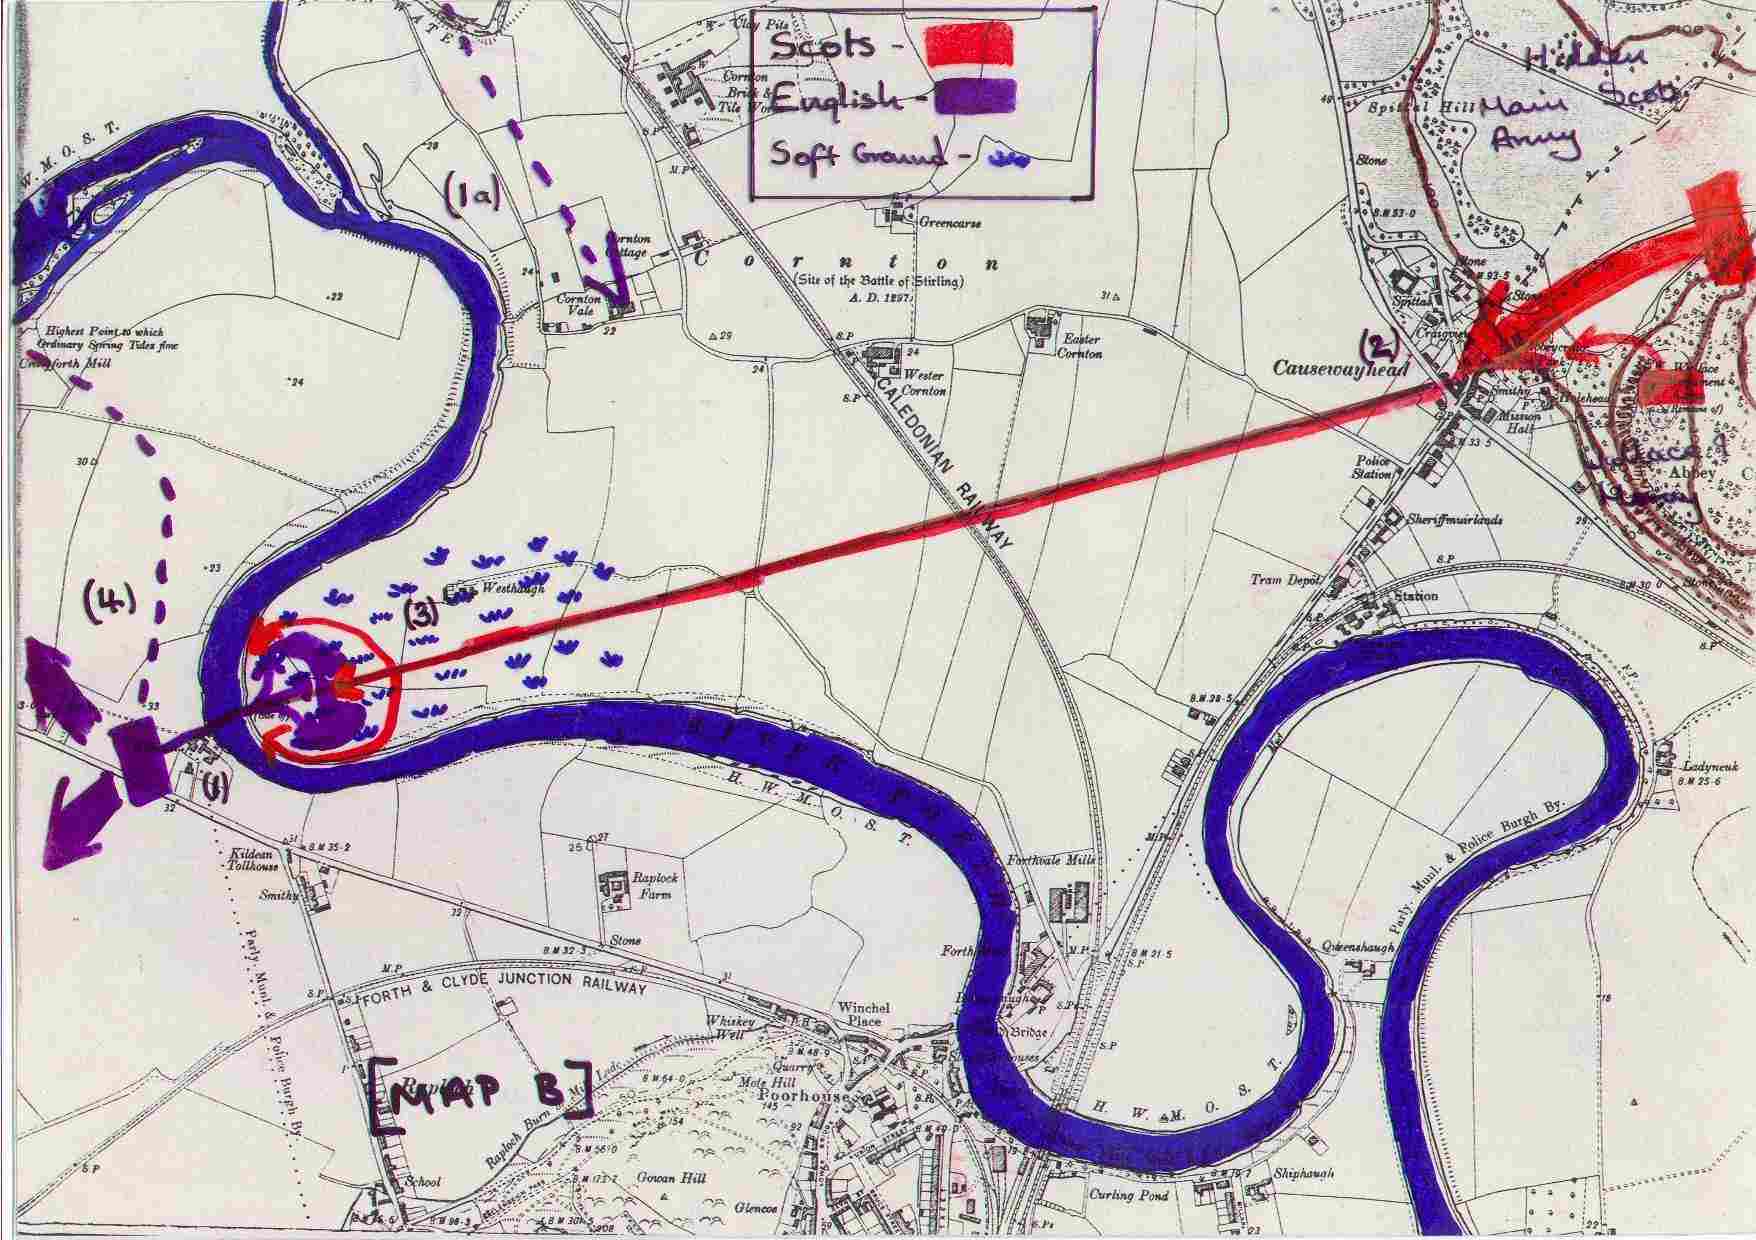
An English army charged with subduing Scotland left Berwick at the end of August 1297
and marched towards Stirling under the joint command of Hugh Cressingham and John de
Warenne, the Earl of Surrey. The force, including many Welsh, reached Stirling on the 10th
of September and was faced by a Scottish force drawn up on the foothills of the Ochils and
on the Abbey Craig which overlooked the mile long causeway linking the only bridge across
the River Forth to the dry ground and Stirling castle. On the morning of the 11th of
September a large force of heavy cavalry and foot marched across the narrow bridge, two
abreast, under the watching eyes of the Scots.[Map B (1)]
When it was deemed enough English troops had crossed, the Scots forces were given the
order to charge and a group of spearmen - hidden from the eyes of the English - set off[Map B (2)] and succeeded in cutting off the bridgehead
which had been formed. The English troops who had crossed the bridge were cut off from
help[Map B (3)], and were duly massacred while the
greater part of the English army watched helpless on the other side of the Forth.[Map B (4)]
The blame for the loss of the battle of Stirling bridge could be placed upon Hugh
Cressingham who, on grounds of expense, turned back reinforcements on the way to Stirling
and who on the day of the battle turned down an idea for an outflanking manoeuvre7 for the
same reason.[Map B (1a)] The tactical skill which was
shown by Wallace and Moray does lend them some credit, yet it was the inept generalship
shown by Warenne and Cressingham on this occasion that won the day for the Scots. However
the idea of footsoldiers in an offensive role is of great interest.
The tactical positioning (as shown on the map) had obviously been worked out well
beforehand and the planning of the battle had, it would seem, taken up a large part of the
Scots time. The timing of the rush down the causeway was crucial to the success of the
Scots as, had too many English troops been allowed to cross, the final outcome could have
been drastically different.
It should also be pointed out that the troops who had beaten this large
semi-professional English army- a balanced force of cavalry, archers and heavy foot- were
the landless peasants and not the great Scottish lords.
The Scots now had to prepare themselves for the wrath which Edward I would surely vent
on his return from campaigning in France. Scotland suffered great misfortune with the
death of Andrew de Moray (possibly due to wounds received at the battle) and subsequently
Wallace was left in sole control of the Scottish forces and ultimately the whole country.
Wallace spent the time between the victory at Stirling and the invasion by Edward I
training his forces. He now had the power, having been made Guardian, to issue a general
summons to raise an army. He organised these soldiers into divisions to guard the possible
landing sites for English troops sailing from the continent.
The number and quality of the English forces raised by Edward can be seen as a
reflection of his wrath and determination to wreak revenge- 2000 horse & 12000 foot,
all veterans of the Flanders campaign.
When Edward invaded in the summer of 1298 he found a barren and wasted land in front of
him, for Wallace had engaged upon a policy of 'scorched earth' in order to frustrate the
English king's attempts at subduing him. Bruce was to repeat this successful strategy in
1310.
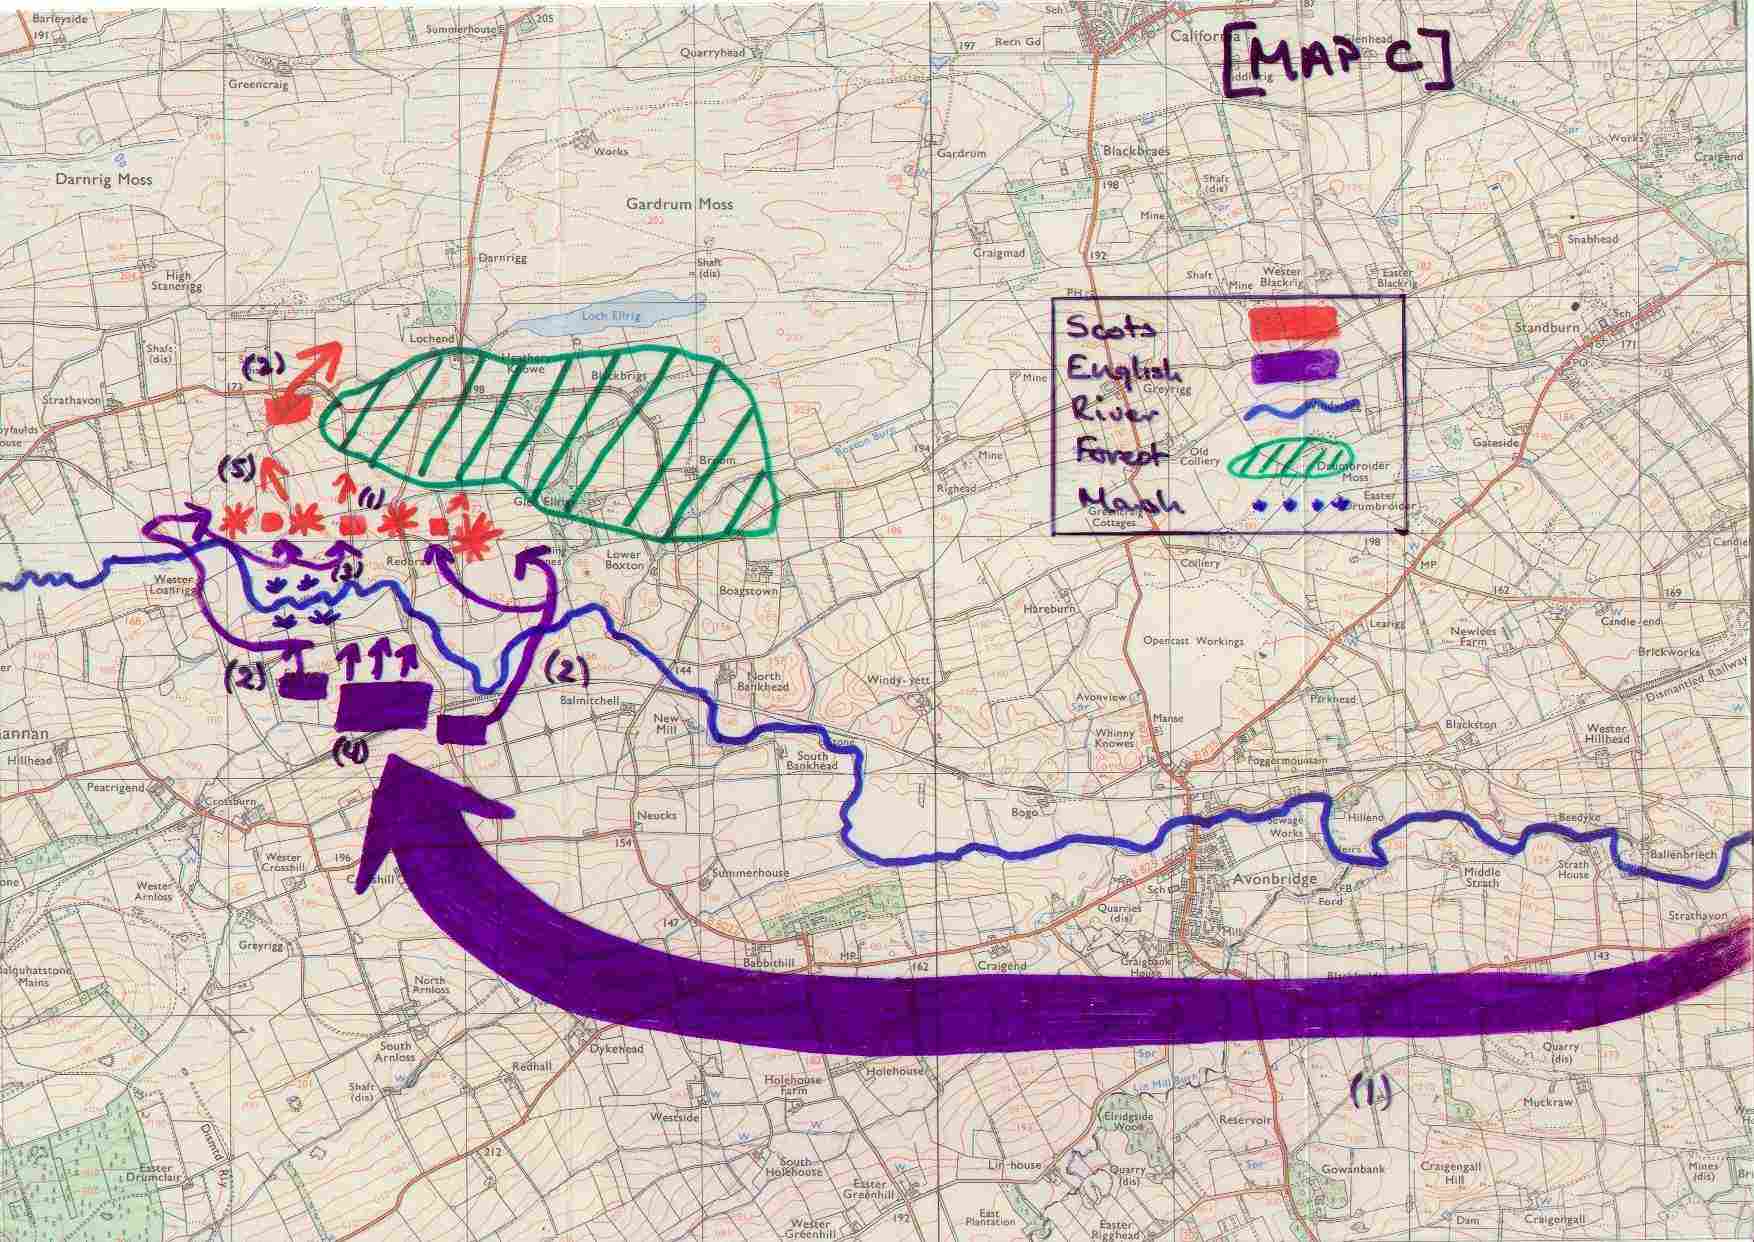
After losing contact with the Scots, Edward received news that they were camped at
Falkirk. The greatest fear of the Scots was the English heavy cavalry (it was this fear
which had led to the surrender at Irvine). To meet this threat, Wallace arranged his
forces in four schiltroms or 'shield-rings' defended by the few Scots archers and fronted
by sharpened stakes and ropes.[Map C (1)] Behind him lay
a wooded area (an extension of Callendar Wood & the Torwood) and in front ran the
River Avon. His forces were arrayed "on hard ground on one side of a hill beside
Falkirk"8
The Scots position was not as strong as at Stirling, yet it was adequate for the type
of defensive battle Wallace intended fighting. His men had been trained to fight in a
strong defensive formation where they stood or sat in ranks, with their 20 feet long pikes
slanting at all angles, the aim being to bring down the charging horses, thereby
incapacitating the mail clad knights.
The events at Falkirk are well documented by Guisborough, although there are other
sources of information available. The battle of Falkirk is a good example of superior
generalship overwhelming a strong opposition. The English cavalry ignored Edward's
proposal for a halt until the foot had eaten, and advanced in two separate
"battles" or brigades until they encountered the marsh in front of the Scots
position.[Map C (2)] They then swung to left and right
endeavouring to go round this obstacle. When the English heavy cavalry had carried out
this manoeuvre they charged the outer Scots schiltroms. Meanwhile the Scots cavalry,
fearing the English feudal might, fled the field.[Map C (2)]
The battle now became a contest between the Scots peasantry in their schiltroms and the
English nobility, and at first the Scots held their ground. The English cavalry, having
ridden down the Scottish archers,[Map C (3)] could make
no headway against the solid ranks of pikes. At this point the Welsh archers and Gascon
crossbowmen moved forward to bring their weapons to bear on the immobile Scots.[Map C (4)]
Slowly but surely the gaps in the schiltroms grew and the English cavalry now began to
exploit them, and their charge finally broke the schiltroms, this dour long-drawn out
battle becoming a massacre.[Map C (5)]
The tactics employed by Wallace of attempting to meet the English on their own terms
failed because he could not counter the combined threat of the English cavalry and Welsh
archers. The tactics used by Wallace were however generally sound. He had sloping ground
to his front with a marsh and river in front of that. Moreover he had a large wooded area
behind him through which to escape. However, when his cavalry fled he had no means of
dispersing the English archers. This meant that no matter how good a position he had, he
could not win the day. Bruce learned by this mistake, and at Bannockburn he had a force of
light horse standing by to disperse any English archers who might threaten his position.
The battle of Falkirk was not decisive, in the sense that afterwards the English still
did not fully control Scotland, but it is important because not until Bannockburn did the
Scots again attempt to fight the English in a pitched battle. The role of Wallace
diminished rapidly, as his reputation in the eyes of his contemporaries was built on his
military successes. The defeat of Wallace at Falkirk raises the possibility that it was
Moray not Wallace who possessed the tactical skill to defeat the English at Stirling
bridge. In any case, after Falkirk the war passes into yet another phase, where the Scots
teetered on the brink of defeat.
Between 1298 and 1304 Scotland returned to the old custom of guardianship. Bruce and
John Comyn were guardians until 1300, when Bruce resigned. Comyn, Bishop Lamberton and
Ingram de Umfraville then led jointly until 1301 when John de Soules was appointed sole
guardian. There were no major battles, but English armies were sent north annually between
1300 and 1303 in order to subdue the country which they only effectively controlled in the
south west. The castles still in Scottish hands held out but fell after sieges involving
huge numbers of English troops.
John Comyn surrendered in 1304, as did most of the others. By 1305 resistance seemed to
be at an end. Wallace had finally been caught and executed, but within six months Robert
Bruce had killed John Comyn and sat himself upon the throne.
The events which followed King Robert I's coronation in 1306 are well documented,
including his rout at Methven9 by Aymer de Valence and his defeat at the hands of John
MacDougall of Lorn at Dail Righ at the head of Strathfillan.10 These left him with only a
few hundred men and in fear for his own safety. Consequently he fled for the Western
Isles, spending the winter of 1306/7 in hiding.
When he returned to Scotland in 1307 his luck seems to have changed. He had a minor
military success in Glentrool,11 with the defeat of an English raiding party. At Loudon
Hill12 he avenged Methven by forcing Valence to fight on a narrow front, having blocked off
the road with earthworks thereby negating the English superiority in numbers. This
demonstrated his increasing tactical awareness.
By 1308, due to his successes, some of which are mentioned above, Bruce had changed his
military position out of all proportion, being now in control of the greater part of
Scotland. He advanced into Argyll following the present day route under the slopes of Ben
Cruachan[Map D (1)]- an excellent place for an ambush-
where he encountered the forces of John MacDougall hidden on the rocky slopes of the Ben.[Map D (1)] Bruce, no doubt expecting an ambush, had sent a
small group of lightly armed men under Douglas scrambling up the slopes in order to get
higher up the Ben than the enemy.[Map D (2)]
As the troops of Bruce came into view along the path the Argyll men fired arrows and
rolled stones down upon them.[Map D (3)] Even as they
did this an answering hail of arrows came from the Highlanders who now charged down the
mountainside,[Map D (3)] with the rest of the king's men
attempting to scramble up the slope to get at John of Lorn's men. [Map D (3)]
With the Argyll men now caught in a pincer movement they could do nothing but flee with
Bruce's men following hotly in pursuit. John of Lorn's troops made it to the only bridge
across the River Awe but had to leave it intact because of the speed at which they were
being chased.[Map D (4)] This enabled Bruce to reach
Dunstaffnage which he at once began to besiege. John of Lorn slipped down Loch Awe in his
galley having watched the battle from it.13
The victory for Bruce at Brander avenged Dail Righ and was a supreme example of the
change both in his fortunes and in his tactical planning. By sending Douglas to climb Ben
Cruachan with lightly armed Highlanders he anticipated an ambush and prepared a
contingency plan.
This change in both tactics and strategy seems to have been thought out during Bruce's
enforced stay in the isles over the winter of 1306/7. On his return there were risings in
both the north and the south at almost the same time. This suggests that planning had
taken place, providing Bruce with the chance to use his tactical skill to great effect. He
decided to secure his base in North and West Scotland by destroying his enemies' power,
before directing his energies on expelling the English. By 1308 he had effective control
of Scotland, apart from the English strongholds. Bruce was helped by the death of Edward I
because he was effectively left unharassed, thereby giving him the opportunity to destroy
his Scottish opponents who had allied themselves with England
Bruce had outstanding successes in the years between Brander and Bannockburn. Chief
among these were the captures of castles with no siege equipment and occasionally without
the need for a siege. He and his lieutenants employed innovative and audacious tactics
which achieved success due to a combination of careful planning, luck and English
carelessness. The tactics involved the use of specially constructed rope ladders which
could be held up against a castle wall by means of an iron grappling hook. In this way
were the castles of Perth (1313) and Roxburgh (1314) taken.
Edward Bruce and the commander of Stirling Castle, Sir Philip Moubray had agreed that
the castle would be surrendered unless a relieving army came within 2 miles of the castle
by mid-summers day 1314. This left Robert Bruce with no option but to fight a pitched
battle with the forces of Edward II, a straight confrontation between the heavy chivalric
cavalry of England and the pike armed foot of Scotland.
Bruce spent his time waiting for the English army by training his troops in order to
give them a greater tactical advantage than Wallace had had. He did this by training his
troops to advance in open order, and when threatened to form a hollow schiltrom, which
could then be used to counter attack.
The English army was composed of about 3000 cavalry and 17000 foot although these
estimates are continually being revised. Time was running out for Edward to reach Stirling
on time and his troops were urged on at great speed and with little rest. Bruce had
arranged his 6000 men into four divisions with his small body of horse under the command
of Robert Keith positioned in the New Park.
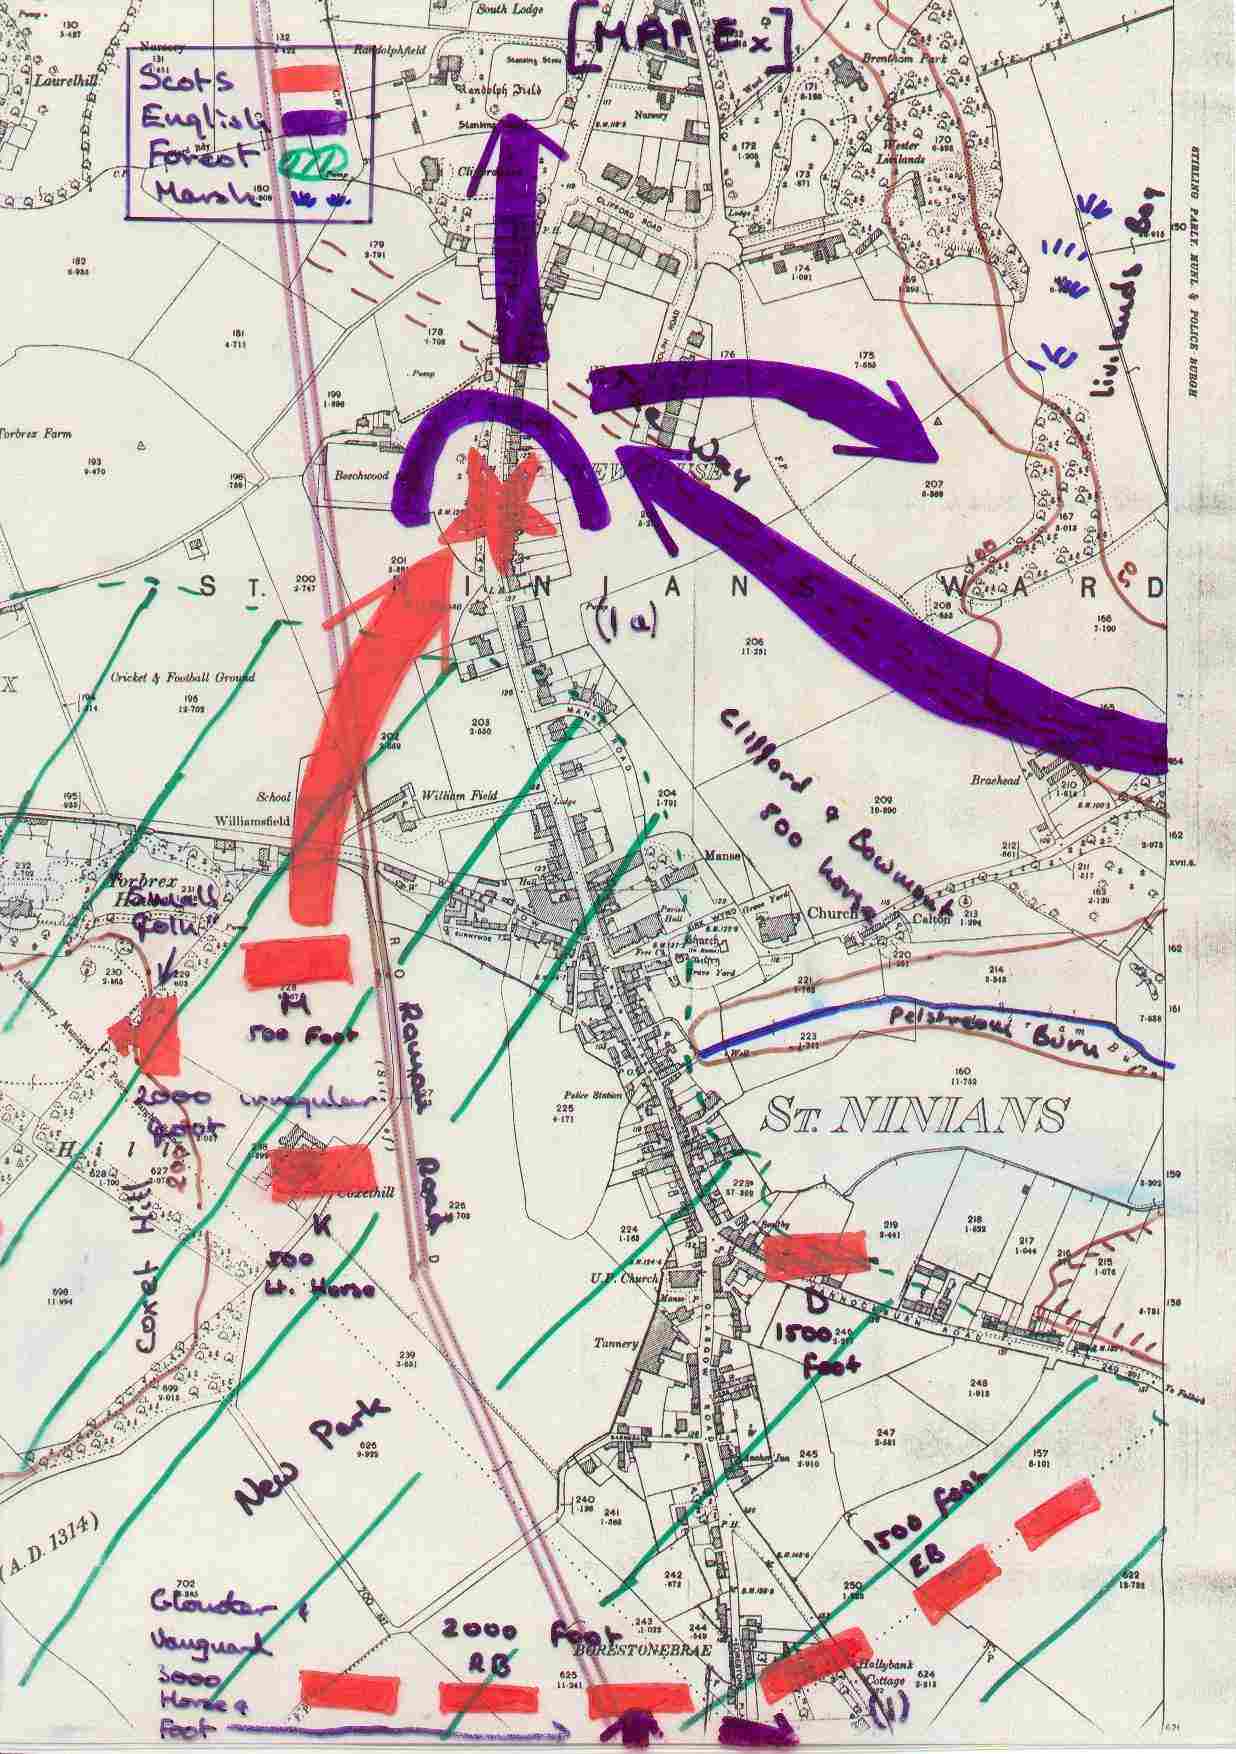
The English forces arrived near Stirling on 23rd June and some of the cavalry pressed
forward without waiting for the main body to arrive. The vanguard advanced along the Roman
road until they encountered the division of Robert Bruce supported by his brother Edward.[Map Ex (1)] The English were beaten off by the strong
Scottish formations and retreated in disarray.
Meanwhile a troop of some 300-800 cavalry14 had advanced through the carse unnoticed by
the Scots[Map Ex (1a)] possibly intending a reconnaissance
of the position or attempting to relieve Stirling castle. Whatever the case, this force
was belatedly challenged by Moray. The English troops saw this challenge as being little
more than sport and allowed the Scots to draw up, in a hollow schiltrom with their pikes
slanting at all angles in order to bring down the horses. When the Scots had formed up,
the English cavalry charged, encircling the schiltrom, but could find no way through. They
eventually resorted to throwing their maces and axes in an attempt to break a way through.
The schiltrom nevertheless stayed firm. Beaten by this, the English began to waver. At
this point Moray began a counter attack from the schiltrom which succeeded in breaking the
English, some of whom fled to Stirling Castle and the rest back the way they had come.
Looking at this engagement, it is obvious that the Scots were well trained and drilled,
for the movement from defence to attack seems to have taken place quickly. This could only
have been done with training and explains why the 'small folk' (the irregular untrained
foot) were kept out of the schiltroms where they would have been a liability.
Edward II had now moved the foot up to the region of the New Park and having received
news of the setbacks earlier in the day he came to the conclusion that he must bivouac
overnight in order to destroy the Scots the next day. The English were in constant fear of
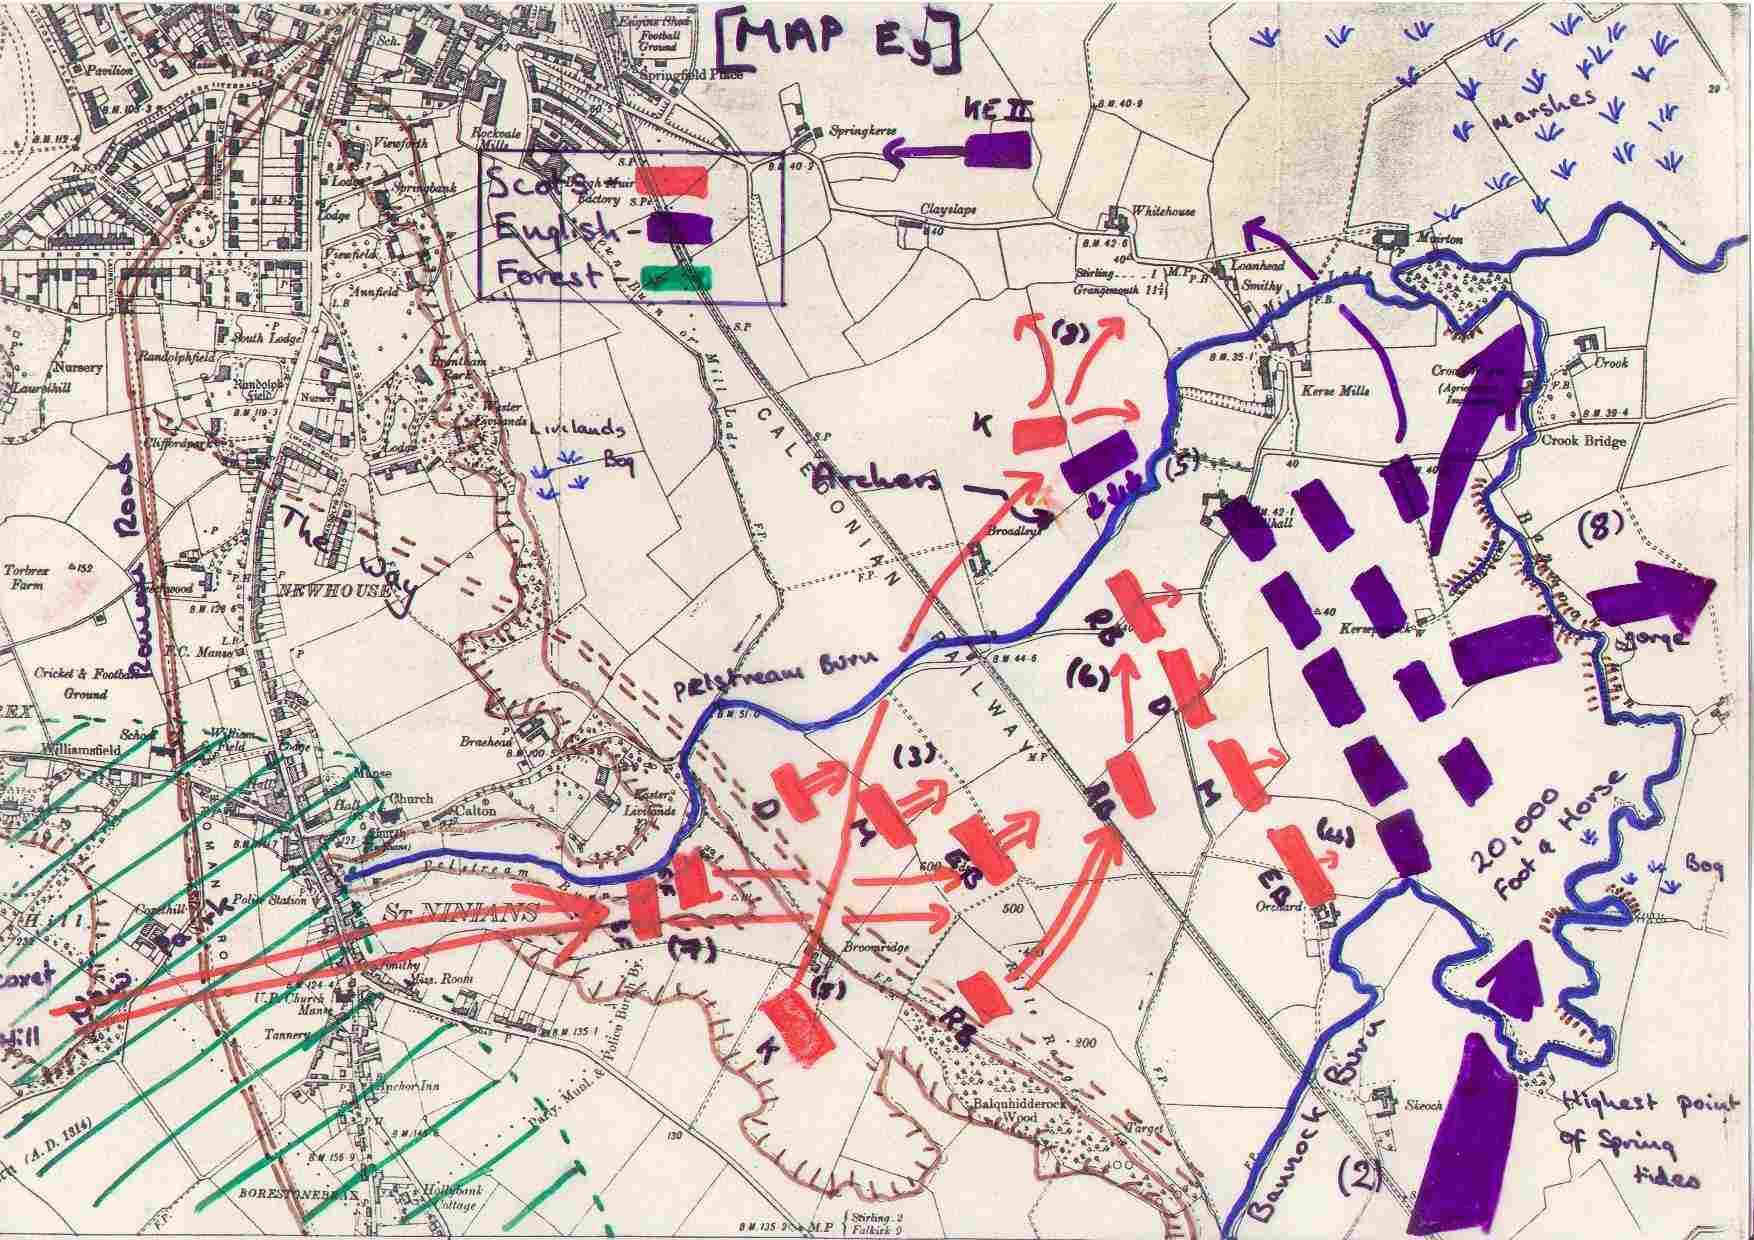
a surprise attack and having crossed the Bannock burn[Map Ey (2)]
spent the night with their horses bitted. The Scots meanwhile were still debating whether
to face the English the next day or whether to retire to Lennox and employ guerrilla
warfare tactics. A Scot in the English service turned the tide when he reported to the
Scots that morale in the English camp was low.15
The next day the Scots advanced from the New Park in open order by the right, i.e. in
echelon, with Edward Bruce's division leading, followed by Moray and then Douglas.[Map Ey (3)] This caught the English by surprise for they did
not expect the Scots to move to attack, thereby seizing the initiative vital for their
success, and in great haste the vanguard led by Gloucester charged the nearest division
(Edward Bruce). They were routed and Gloucester killed.
The English vanguard was now driven back into the main body of the army which was
constricted in movement due to their cramped position, almost like a great schiltrom16.
This prevented the proper deployment of the various arms of the force. The Scots drove
home their advantage with the three divisions of Moray, Douglas and Edward Bruce pressing
the English back.[Map Ey (4)] At length a body of archers
managed to get out onto the Scots flank and their fire began to take effect17. It was for
precisely this situation that Bruce, perhaps with the lessons of Falkirk in mind, had kept
the body of light horse apart from the Scottish army and it now charged and dispersed the
archers,[Map Ey (5)] "A classic example of the
correct use of an inferior force of cavalry"18. With the dispersal of the archers
Bruce moved his reserve division up onto the flank of Douglas and the Scots again began to
press the English back into the Bannock Burn.[Map Ey (6)]
At this point the "small folk" appeared from the forest having been hidden in a
valley behind Coxet hill.{Map Ey (7)] To the English this
appeared to be a fresh army coming to add to the already overwhelming pressure on them,
and consequently the English army broke and the battle became a rout.[Map Ey (8)]
The broken English army fled; the right towards Stirling castle in such numbers that
Bruce thought that they would have to be fought next day, the centre towards the Forth
where they were destroyed in the marshes and the left into the gorge of the Bannock Burn
where they were compressed and many drowned. Edward II and his retinue fled the field,
pursued by Douglas and the light horse, and made their escape to Berwick being too strong
in numbers to be overcome.
The defeat at Bannockburn was a severe dent to the pride of England for they had been
beaten by an army almost entirely composed of foot soldiers, a thing almost unheard of in
medieval warfare.19 The tactics employed by Bruce showed how superior a general he was
compared to Edward II. His use of the ground and indeed his deployment of both men and
horse were masterful. The men were very highly trained, and it was this training, combined
with a cohesion between the leaders and their men, cavalry and footsoldiers which gave the
Scots victory.
However it must be said that the severe tactical blunders which were committed by the
English were also a prime factor, for these gave the Scots a tactical superiority. The
English army lacked the vital factor of cohesion between the leaders and the common
soldiery. The cavalry tended to act independently of the foot and the jealousies involved
severely hampered their actions.
They also chose to fight on a battlefield which made it impossible for them to deploy
effectively. This allowed the Scots to dictate the battle and the English paid the price.
The tactics and strategy employed by the Scottish armies between 1296 and 1314 evolved
over the period. Wallace began with the lessons of Dunbar in mind and consequently the
development of the lightly armed foot soldier was begun. Wallace also used raids into
England as part of his overall strategy, both as a means of raising money and as a means
of retaliation. The defeat at Falkirk could be seen as a watershed in the use of foot, for
afterwards Bruce altered Wallace's schiltroms in order that they could become more mobile
and therefore less of a target for English archers.
Robert Bruce, took Wallace's tactical ideas further forward in evolutionary terms for
he used raids into England purely as a means of raising finance through blackmail etc. His
long term aim was of course the defeat of the English and the removal of their forces from
Scotland. Yet he knew that to do this he would need to defeat the English in the field in
a major battle.
Overall the tactics and strategy of the Scottish armies came 'full circle' for after
1296 there was a move away from 'normal' feudal warfare towards a form more suited to
Scotland's capability in both financial and military terms. The changes were refined and
improved over a succession of military campaigns, from defeat at Falkirk to victory at
Bannockburn. Following the death of Robert I in 1329, Scottish tactics suffered a
regression. At Halidon Hill and Dupplin Moor in 1332 and 1333 the Scottish schiltroms were
destroyed by English archers. It would seem therefore that the tactics worked out by Bruce
and his lieutenants died with them.
- The term 'guerrilla warfare' usually refers to irregular soldiers fighting behind enemy lines, attacking lines of communication and supplies etc. Here, however, I use the term to describe the strategy employed by both Bruce and Wallace of engaging the enemy only when the terrain and logistical conditions were in their favour.
- I have found the articles written by J.F. Lydon on the hobelar and its development including its use in 1296 published in editions of The Irish Sword for 1954 and 1962 vols ii & v ("The Hobelar an Irish contribution to Medieval warfare" & "An Irish army in Scotland, 1296") particularly useful in elucidating this short lived component of the late medieval army. Also particularly useful in this respect is an article by J.E. Morris published in the volume of Transactions of the Royal Historical Society for 1914 on the development of "Mounted infantry in medieval warfare". Under Wallace light horse was used in a reconnaissance role. They would report back to the main army any information as regards cattle and the like for the foot to go and deal with.
- The king of Norway was determined upon a show of strength over the rule of the Western Isles and sailed for Scotland with a large fleet. (Norwegian estimates are of a fleet of 160 ships and 20,000 men, a possible exaggeration). When Hakon arrived in late September he had to draw up his fleet between Cumbraes and Cunningham in preparation for a landing at Largs.
There was a great storm during the night of October 1/2 and many Norwegian ships, out of control, were driven ashore out of the reach of effective help from those ships still under control. During the night and the next day the Norwegians were attacked and slaughtered. King Hakon withdrew with serious loss of both ships and men and died in Orkney on the return journey to Norway. Adapted from W. Croft Dickenson, Scotland from earliest times to 1603, (Thomas Nelson & Sons) 1961, p. 41
- Chronicle of Walter of Guisborough, as translated in Scottish Independence (1100-1329) An Archive Teaching Unit, (Scottish Centre for Social Subjects), p 55; J. Stevenson, Documents Illustrative of the History of Scotland. 1286-1306, (H.M. Register house.) Edinburgh 1870 Vol ii, no. 26
- Bartholomew Cotton, Historia Anglicana (ed. Luard Rolls Series), 312, this says the dead were, on Edward's orders, counted under the close supervision of Earl Patrick of Dunbar and Sir John Benstead and numbered some 10,052 (This is probably an exaggeration). Given in G.W.S. Barrow Robert Bruce & the Community of the Realm., (Edinburgh University Press) 1988, p 340 note 14.
- Stevenson, op. cit, no.455.
- Chronicle of Guisborough. op. cit. p 61; Via the Fords of Drip referred to as a crossing in 1304, J. Bain Calendar of Documents relating to Scotland., (H.M. General register House) Edinburgh 1887, vol ii, nos 1462, 1470
- Chronicle of Guisborough. op. cit. p 65. Guisborough either makes a slip when he refers to the "foresta de Selkyrke" or makes a mistake, for there is agreement that this battle was fought either at or beside Falkirk. The actual site of the battle, to my knowledge, still remains a mystery and so with reference to the sources I have attempted to place the site and hence my map (p) can be consulted.
- Chronicle of John of Fordun, as translated in Scottish Independence (1100-1329) An Archive Teaching Unit, (Scottish Centre for Social Subjects), p 118-9.
- Ibid; J Barbour, The Bruce. ed. A.A.H. Douglas (Macllellan) 1964, p83.
- Ibid. p 188; Bain, op.cit. nos. 129-33
- Ibid, nos. 136-42; Chronicle of Guisborough. op. cit. p 69.
- Barbour. op. cit. p 235-6; Chronicle of Fordun.,120.
- Scalacronica. The reigns of Edward I, Edward II & Edward III. translated by Sir Herbert Maxwell (Glasgow) 1907 . p 141; Barbour, op. cit, p 275.
- Proceedings of the Society of Antiquaries of Scotland. 1956-7 xc XI "Bannockburn a study in military History" General Sir P. Christison. 177.
- Barbour, op. cit. p 292.
- Barbour, op.cit. p 299.
- Christison op. cit., 177
- Although a Flemish army armed with pikes had destroyed the flower of French chivalry at Courtrai in 1302.
| Ashdown. C.H. British & Foreign Arms & Armour (London), 1909. |
| Bain. J. Calendar of Documents relating to Scotland (H.M. Register House), 1870. |
| Barbour. J The Bruce. ed. A.A.H. Douglas (MacLellan), 1964. |
| Barron. Dr. E.M. The Scottish War of Independence (Carruthers), 1934. |
| Barrow. G.W.S. Kingship & Unity 1000-1306 (Edinburgh University Press), 1989. |
| Barrow G.W.S. Robert Bruce & the Community of the Realm (Edinburgh University Press), 1988. |
| Brown. P. Hume. A Short History of Scotland. ed. H.W. Meikle (Oliver & Boyd), 1955. |
| Christison. Gen. Sir P. "Bannockburn- A study in military history"- Proceedings of the Society of Antiquaries of Scotland, 1959. |
| Dickenson. W. Croft. Scotland from earliest times to 1603 (Thomas Nelson & sons.), 1961. |
| Dickenson. W. Croft, Donaldson. D., Milne. I.A. A Source book of Scottish History (Thomas Nelson & sons), 1958. |
| Duncan. Prof. A.M. Scottish Independence (1100-1329) An Archive Teaching Unit (Scottish Centre for Social Subjects). |
| Ferguson. J. William Wallace- Guardian of Scotland. (MacLehose), 1938. |
| Glover. J.R. The Story of Scotland (Faber & Faber), 1960. |
| Lydon. J.F. "The Hobelar- An Irish contribution to medieval warfare." & "An Irish Army in Scotland 1296"- The Irish Sword, Volumes II & V, 1954 & 1962. |
| MacKenzie Dr. A.M. Robert Bruce King of Scots (MacLehose), 1934. |
| MacKenzie Dr. W.M. Bannockburn: A Study in medieval warfare (MacLehose), 1989. |
| Mackie. R.L. A Short History of Scotland (Oxford University Press), 1955 |
| McKisack M. The Fourteenth Century 1307-1399. Oxford History of England. (Clarendon Press), 1959. |
| Morris J.E. Bannockburn (Cambridge University Press), 1914. |
| Morris J.E. "Mounted Infantry in medieval warfare"- Transactions of the Royal Historical Society, 1914. |
| Oakeshott R.Ewart A knight & his armour (London), 1961. |
| Oakeshott R.Ewart A knight & his horse (London), 1962. |
| Oakeshott R.Ewart A knight & his weapons (London), 1965. |
| Oman Sir C. Art of war in the middle ages (Cornell University Press), 1961. |
| Powicke Sir M. The Thirteenth century 1216-1307 Oxford History of England. (Clarendon Press), 1953. |
| Prestwich M. War politics & finance under Edward I, (Gregg Revivals), 1992. |
| Stevenson J. Documents illustrative of the history of Scotland (H.M. General Register House), 1870. |
Map references are given thus: [Map A (4)]
|